 As part of the TJ Holiday Blogstravaganza, I have a tutorial for you today to make the card on the right. This is a really easy technique for adding a rainbow of color to Raised Cuttlebug images. It works especially well on embossing folders with a large raised surface area, such as the snowman one I used for this tutorial.
Rainbow Cuttlebug Tutorial

Supplies:
*White or Cream Cardstock
*Kaleidacolor or Rainbow Pad
*Rubber Brayer
*Embossing Folder
*Cuttlebug
To start, run the embossing folder through the Cuttlebug. The folders that work best with this are those that have a large area of embossing, such as the one I am using in this tutorial.
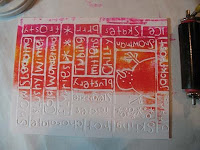
Using the Rubber Brayer, pick up the rainbow ink and brayer it onto one side of the cardstock. I used a little brayer for this tutorial because I found that I could apply more consistent pressure with the ink. I have used my large brayer with great results, though, so don't worry if you don't have a little one!
To add ink to the other side, just flip the paper 180 degrees and brayer again, overlapping the center areas. This method of brayering rainbow pads gives very nice, consistently blended color.

If there are areas on the cardstock that did not "take" the ink, and repeated attempts at rolling the ink are are not working, don't fret! There is a very easy fix for that...

Simply re-ink an inch or two of the brayer and run it back over the white spot. Even though you might be adding a different color to the spot (which I did here), I assure you, it will not be noticeable.

To finish the card, I ran a second piece of white paper through my Cuttlebug, cut out the snowman, colored him with markers and added glitter. I then double mounted him and the trimmed rainbow layer on cardstock. The snowflakes are chipboard that I painted white, and glittered.
Easy, right?
Let me see your Rainbow Cuttlebug Creations! Email me pictures if you try this technique, OR send them to the TJ yahoo group OR post a link in the comments below with your creations. I will pick one randomly this Thursday at noon. The randomly chosen winner will receive THREE issues of the Technique Junkie Newsletter. All of the entries will be displayed in a slide show on this blog on Thursday.
Won't you play along?
Remember, Every day from now through Christmas there will be artwork, tutorials, giveaways, contests and challenges! Join us every day!
If you have a minute, take a look at the design team members who are participating in the TJ Blogstravaganza today:
Lisa Somerville at Splendiferous Creations
Artful Sentiments by Kimm Bennington Thompson
Sunflowers and Dragonflies by Beth Norman
Have fun!


4 comments:
OH my Gosh! I can't believe how easy that looks. I love it, Pat.
Wow this card is just beautiful. What a great and easy to follow tutorial.
Neat card. One question: Did you reink the brayer for the second pass over the paper after turning it? I'd like to try this with the floral folder I have.
Hello Pat!
Love this techniek!! My variation is here: http://craftchaos.blogspot.com/2008/11/rainbow-cuttlebug.html
Thanks for always inspiring us!!
Hetty
Post a Comment